
27 KiB
Kubernetes
Terminology
Pod
- Single container
- Multiple containers
- share ip
- share volumes
Information you get when list pods
➜ k get pods
NAME                                    READY   STATUS      RESTARTS   AGE
cloud-sql-proxy-66d-71222342354s        1/1     Running     0          42d
Node
Basically is a Kubernetes client or agent which runs a bunch of pods.
Service
- ClusterIP (default)
- NodePort ( access by port)
- LoadBalancer (external ip)
- ExternalName dns
Deployment
A Deployment provides declarative updates for Pods and ReplicaSets.
You describe a desired state in a Deployment, and the Deployment Controller changes the actual state to the desired state at a controlled rate. You can define Deployments to create new ReplicaSets, or to remove existing Deployments and adopt all their resources with new Deployments.
Replica Set
A ReplicaSet’s purpose is to maintain a stable set of replica Pods running at any given time. As such, it is often used to guarantee the availability of a specified number of identical Pods.
Service rolling update
DaemonSet
Running that pod on every node.
- running a cluster storage daemon, such as
glusterd,ceph, on each node - running a logs collection daemon on every node, such as
fluentdor logstash. - running a node monitoring daemon on every node, such as Prometheus Node Exporter, collectd, New Relic agent.
StatefulSet
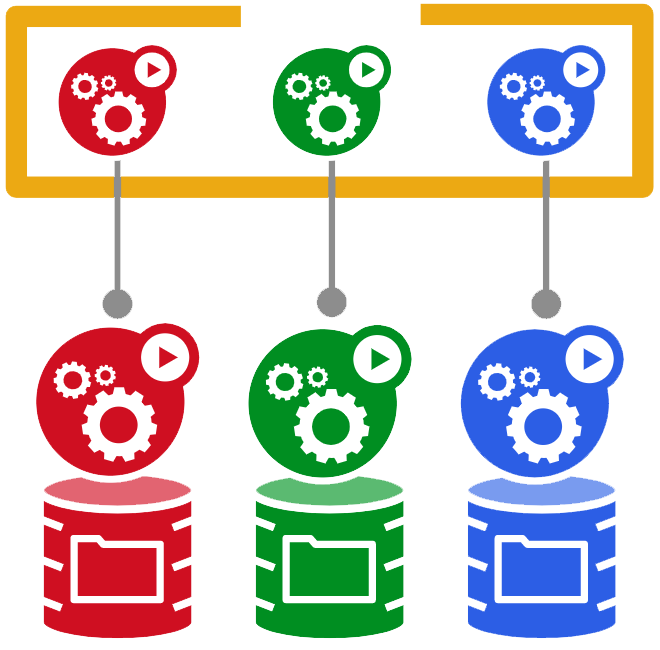
StatefulSets represent a set of pods with unique, persistent identities and stable hostnames. The state information and other resilient data for any given StatefulSet Pod is maintained in persistent disk storage associated with the StatefulSet.
StatefulSets are designed to deploy stateful applications and clustered applications that save data to persistent storage, such as Google Compute Engine persistent disks. StatefulSets are suitable for deploying Kafka, MySQL, Redis, ZooKeeper, and other applications needing unique, persistent identities and stable hostnames. For stateless applications, use Deployments.
Key features
- Ordered, graceful deployment and scaling
- Stable, persistent storage.
- Stable, unique network identifiers.
- Ordered, graceful deletion and termination.
An example
apiVersion: v1
kind: Service
metadata:
  name: nginx
  labels:
    app: nginx
spec:
  ports:
  - port: 80
    name: web
  clusterIP: None
  selector:
    app: nginx
---
apiVersion: apps/v1
kind: StatefulSet
metadata:
  name: web
spec:
  selector:
    matchLabels:
      app: nginx # Label selector that determines which Pods belong to the StatefulSet
                 # Must match spec: template: metadata: labels
  serviceName: "nginx"
  replicas: 3
  template:
    metadata:
      labels:
        app: nginx # Pod template's label selector
    spec:
      terminationGracePeriodSeconds: 10
      containers:
      - name: nginx
        image: gcr.io/google_containers/nginx-slim:0.8
        ports:
        - containerPort: 80
          name: web
        volumeMounts:
        - name: www
          mountPath: /usr/share/nginx/html
  volumeClaimTemplates:
  - metadata:
      name: www
    spec:
      accessModes: [ "ReadWriteOnce" ]
      resources:
        requests:
          storage: 1Gi
Update Statefulset
To decide how to handle updates, StatefulSets use a update strategy defined in spec: updateStrategy. There are two strategies, OnDelete and RollingUpdate:
-
OnDeletedoes not automatically delete and recreate Pods when the object's configuration is changed. Instead, you must manually delete the old Pods to cause the controller to create updated Pods. -
RollingUpdateautomatically deletes and recreates Pods when the object's configuration is changed. New Pods must be in Running and Ready states before their predecessors are deleted. With this strategy, changing the Pod specification automatically triggers a rollout. This is the default update strategy for StatefulSets.
StatefulSets update Pods in reverse ordinal order. You can monitor update rollouts by running the following command:
kubectl rollout status statefulset [STATEFULSET_NAME]
Partitioning rolling updates
When you partition an update, all Pods with an ordinal greater than or equal to the partition value are updated when you update the StatefulSet’s Pod specification. Pods with an ordinal less than the partition value are not updated and, even if they are deleted, are recreated using the previous version of the specification. If the partition value is greater than the number of replicas, the updates are not propagated to the Pods.
Proxy
Creates a proxy server or application-level gateway between localhost and the Kubernetes API Server. It also allows serving static content over specified HTTP path. All incoming data enters through one port and gets forwarded to the remote kubernetes API Server port, except for the path matching the static content path.
DNS
- service.namespace
Secrets
For storing keys, credentials and certificates. For instance: database token, 3rd party API keys.
Persistent volumes
- Available
- a free resource that is not yet bound to a claim
- Bound
- the volume is bound to a claim
- Released
- the claim has been deleted, but the resource is not yet reclaimed by the cluster
- Failed
- the volume has failed its automatic reclamation
kubelet
The kubelet is the primary “node agent” that runs on each node. It can register the node with the apiserver using one of: the hostname; a flag to override the hostname; or specific logic for a cloud provider. The kubelet works in terms of a PodSpec
CRD(CustomResourceDefinitions)
The CustomResourceDefinition API resource allows you to define custom resources. Defining a CRD object creates a new custom resource with a name and schema that you specify. The Kubernetes API serves and handles the storage of your custom resource.
| RDs | Aggregated API |
|---|---|
| Do not require programming. Users can choose any language for a CRD controller. | Requires programming in Go and building binary and image. Users can choose any language for a CRD controller. |
| No additional service to run; CRs are handled by API Server. | An additional service to create and that could fail. |
| No ongoing support once the CRD is created. Any bug fixes are picked up as part of normal Kubernetes Master upgrades. | May need to periodically pickup bug fixes from upstream and rebuild and update the Aggregated APIserver. |
| No need to handle multiple versions of your API. For example: when you control the client for this resource, you can upgrade it in sync with the API. | You need to handle multiple versions of your API, for example: when developing an extension to share with the world. |
Liveness vs Readiness
Liveness
The kubelet uses liveness probes to know when to restart a Container. For example, liveness probes could catch a deadlock, where an application is running, but unable to make progress. Restarting a Container in such a state can help to make the application more available despite bugs.
The kubelet uses readiness probes to know when a Container is ready to start accepting traffic. A Pod is considered ready when all of its Containers are ready. One use of this signal is to control which Pods are used as backends for Services. When a Pod is not ready, it is removed from Service load balancers.
The kubelet uses startup probes to know when a Container application has started. If such a probe is configured, it disables liveness and readiness checks until it succeeds, making sure those probes don’t interfere with the application startup. This can be used to adopt liveness checks on slow starting containers, avoiding them getting killed by the kubelet before they are up and running.
apiVersion: v1
kind: Pod
metadata:
  name: goproxy
  labels:
    app: goproxy
spec:
  containers:
  - name: goproxy
    image: k8s.gcr.io/goproxy:0.1
    ports:
    - containerPort: 8080
    readinessProbe:
      tcpSocket:
        port: 8080
      initialDelaySeconds: 5
      periodSeconds: 10
    livenessProbe:
      tcpSocket:
        port: 8080
      initialDelaySeconds: 15
      periodSeconds: 20
Readiness
Sometimes, applications are temporarily unable to serve traffic. For example, an application might need to load large data or configuration files during startup, or depend on external services after startup. In such cases, you don’t want to kill the application, but you don’t want to send it requests either. Kubernetes provides readiness probes to detect and mitigate these situations. A pod with containers reporting that they are not ready does not receive traffic through Kubernetes Services.
readinessProbe:
  exec:
    command:
    - cat
    - /tmp/healthy
  initialDelaySeconds: 5
  periodSeconds: 5
Several ways to access a service inside Kubernetes cluster
- ClusterIP, Can only be accessed inside the cluster. You can access inside
kubectl proxy - NodePort, You can access the service by a specific public port between
30000–32767, if the cluster server IP changes, then your service' endpoint url changes. - LoadBalancer, it's kind of external service, all the requests go through the loadbalancer. Every service needs a new IP for this.
- Ingress, can be shared among multiple services, you can have different types of ingress controllers:
gec,nginx,contour,istioand so on.
Links:
Kubernetes components
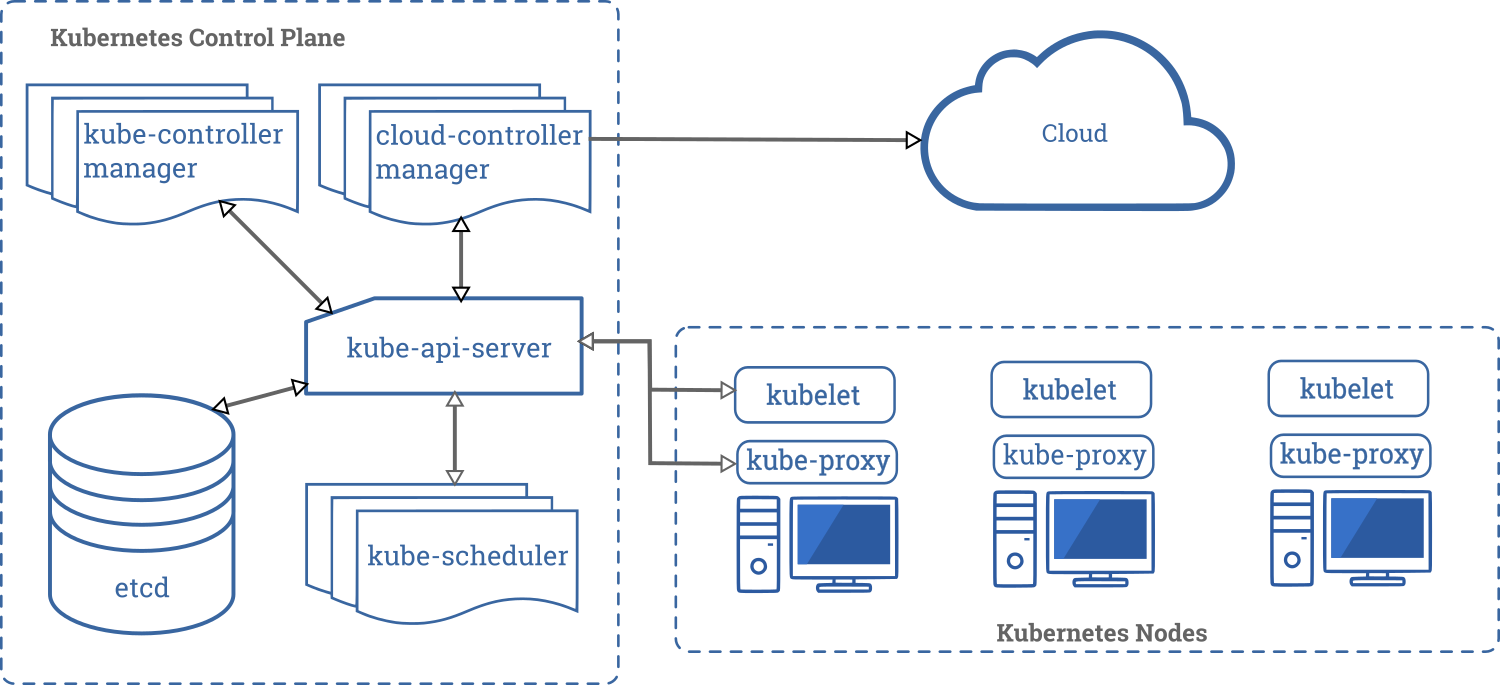
A Kubernetes cluster consists of a set of worker machines, called nodes, that run containerized applications. Every cluster has at least one worker node.
The worker node(s) host the pods that are the components of the application. The Control Plane manages the worker nodes and the pods in the cluster. In production environments, the Control Plane usually runs across multiple computers and a cluster usually runs multiple nodes, providing fault-tolerance and high availability.
Components
Control Plane Components
-
kube-apiserverThe API server is a component of the Kubernetes control plane that exposes the Kubernetes API. The API server is the front end for the Kubernetes control plane -
etcdConsistent and highly-available key value store used as Kubernetes’ backing store for all cluster data. -
kube-schedulerControl Plane component that watches for newly created pods with no assigned node, and selects a node for them to run on -
kube-controller-managerControl Plane component that runs controller processes. These controllers include:- Node Controller: Responsible for noticing and responding when nodes go down.
- Replication Controller: Responsible for maintaining the correct number of pods for every replication controller object in the system.
- Endpoints Controller: Populates the Endpoints object (that is, joins Services & Pods).
- Service Account & Token Controllers: Create default accounts and API access tokens for new namespaces.
-
cloud-controller-managerruns controllers that interact with the underlying cloud providers
Node Components
Node components run on every node, maintaining running pods and providing the Kubernetes runtime environment.
kubeletAn agent that runs on each node in the cluster. It makes sure that containers are running in a pod. The kubelet takes a set of PodSpecs that are provided through various mechanisms and ensures that the containers described in those PodSpecs are running and healthy.kube-proxykube-proxy is a network proxy that runs on each node in your cluster, implementing part of the Kubernetes Service concept. kube-proxy maintains network rules on nodes. These network rules allow network communication to your Pods from network sessions inside or outside of your cluster. kube-proxy uses the operating system packet filtering layer if there is one and it’s available. Otherwise, kube-proxy forwards the traffic itself.Container RuntimeThe container runtime is the software that is responsible for running containers.
Addons
Addons use Kubernetes resources (DaemonSet, Deployment, etc) to implement cluster features. Because these are providing cluster-level features, namespaced resources for addons belong within the kube-system namespace
DNSWhile the other addons are not strictly required, all Kubernetes clusters should have cluster DNS, as many examples rely on it. Cluster DNS is a DNS server, in addition to the other DNS server(s) in your environment, which serves DNS records for Kubernetes servicesWeb UI (Dashboard)Dashboard is a general purpose, web-based UI for Kubernetes clusters.Container Resource MonitoringContainer Resource Monitoring records generic time-series metrics about containers in a central database, and provides a UI for browsing that data.Cluster-level LoggingA cluster-level logging mechanism is responsible for saving container logs to a central log store with search/browsing interface.
Kubernetes pod lifecycle
Through its lifecycle, a Pod can attain following states:
-
Pending: The pod is accepted by the Kubernetes system but its container(s) is/are not created yet. -
Running: The pod is scheduled on a node and all its containers are created and at-least one container is in Running state. -
Succeeded: All container(s) in the Pod have exited with status 0 and will not be restarted. -
Failed: All container(s) of the Pod have exited and at least one container has returned a non-zero status. -
CrashLoopBackoff: The container fails to start and is tried again and again.
Creating Highly Available clusters with kubeadm
With stacked control plane nodes
Init first control planekubeadm init --control-plane-endpoint "LOAD_BALANCER_DNS:LOAD_BALANCER_PORT" --upload-certsJoin the rest control planeskubeadm join 192.168.0.200:6443 --token 9vr73a.a8uxyaju799qwdjv --discovery-token-ca-cert-hash sha256:7c2e69131a36ae2a042a339b33381c6d0d43887e2de83720eff5359e26aec866 --control-plane --certificate-key f8902e114ef118304e561c3ecd4d0b543adc226b7a07f675f56564185ffe0c07
External etcd nodes
Setting up a cluster with external etcd nodes is similar to the procedure used for stacked etcd with the exception that you should setup etcd first, and you should pass the etcd information in the kubeadm config file.
Flow chart of running a pod
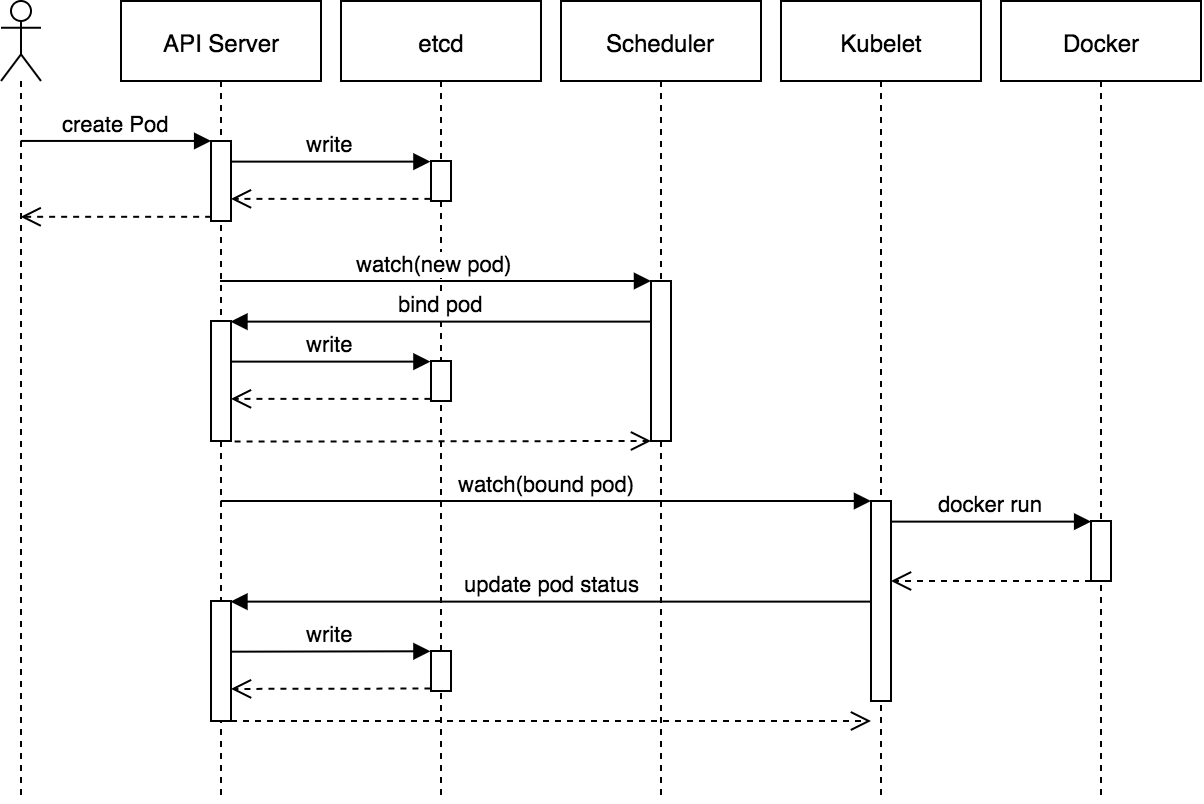
Chart from: https://blog.heptio.com/core-kubernetes-jazz-improv-over-orchestration-a7903ea92ca
Kubernetes termination lifecycle
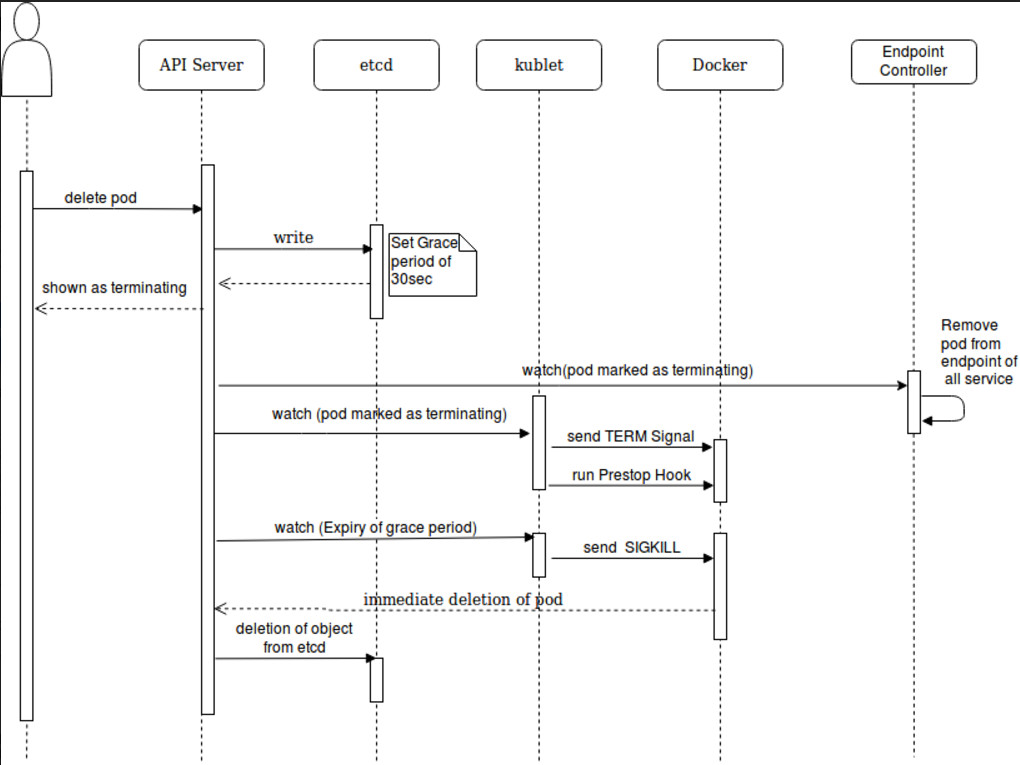
Chart from: https://dzone.com/articles/kubernetes-lifecycle-of-a-pod
Zero down time deployment
Set strategy type to RollingUpdate instead of Recreate
spec:
  replicas: 1
  strategy:
    type: RollingUpdate
    rollingUpdate:
      maxUnavailable: 50%
      maxSurge: 1
Some useful commands
kubectl config set-context context-name --namespace default-namespace-name #default active context
kubectl config view #view config
kubectl get nodes #get nodes
kubectl get namespaces #get all namespaces
kubectl get pods #get pods
kubectl get deployments #get deployments
kubectl logs -f <pod> --tail 200 # tail logs from some pod
kubectl get services #get services
kubectl get ingress #get ingresses
kubectl get hpa # get horizontal auto scaling policies
kubectl get all # get all kinds of units
kubectl get secrets <secret-id> -o yaml #view a secret details with yaml format, fields are encrypted with base64
# List all Secrets currently in use by a pod
kubectl get pods -o json | jq '.items[].spec.containers[].env[]?.valueFrom.secretKeyRef.name' | grep -v null | sort | uniq

# List Events sorted by timestamp
kubectl get events --sort-by=.metadata.creationTimestamp

kubectl run -i --tty busybox --image=busybox -- sh  # Run pod as interactive shell
kubectl run nginx --image=nginx --restart=Never -n
mynamespace                                         # Run pod nginx in a specific namespace
kubectl run nginx --image=nginx --restart=Never     # Run pod nginx and write its spec into a file called pod.yaml
--dry-run -o yaml > pod.yaml

kubectl attach my-pod -i                            # Attach to Running Container and get the current running process

kubectl top pod POD_NAME --containers               # Show metrics for a given pod and its containers

kubectl config view -o jsonpath='{.users[].name}'    # display the first user
kubectl config view -o jsonpath='{.users[*].name}'   # get a list of users
kubectl config get-contexts                          # display list of contexts
kubectl config current-context                       # display the current-context
kubectl config use-context my-cluster-name           # set the default context to my-cluster-name

# add a new cluster to your kubeconf that supports basic auth
kubectl config set-credentials kubeuser/foo.kubernetes.com --username=kubeuser --password=kubepassword

# permanently save the namespace for all subsequent kubectl commands in that context.
kubectl config set-context --current --namespace=ggckad-s2

# set a context utilizing a specific username and namespace.
kubectl config set-context gce --user=cluster-admin --namespace=foo \
  && kubectl config use-context gce

kubectl config unset users.foo                       # delete user foo
Some explanation
kubectl exec with attach
The main difference is in the process you interact with in the container:
exec: any one you want to create
attach: the one currently running (no choice)
Kubernetes port forward
kubectl port-forward allows using resource name, such as a pod name, to select a matching pod to port forward to Which is perfect for testing the remote service/pods in your local. e.g. Forward your db port to a local port, you can connect to your remote db even it doesn't have a public IP.
kubectl port-forward redis-master-765d459796-258hz 7000:6379

kubectl port-forward pods/redis-master-765d459796-258hz 7000:6379

kubectl port-forward deployment/redis-master 7000:6379

kubectl port-forward rs/redis-master 7000:6379

kubectl port-forward svc/redis-master 7000:6379
Kubernetes Dashboard
Deploy Dashboard
kubectl create -f https://raw.githubusercontent.com/kubernetes/dashboard/master/src/deploy/recommended/kubernetes-dashboard.yaml
Access dashboard
# First fetch cluster info, make sure cluster is running properly
kubectl cluster-info

# Normally the url for dashboard would be
http://your_ip:8080/api/v1/namespaces/kube-system/services/https:kubernetes-dashboard:/proxy/
Configure Kubectl to access remote Kubernetes cluster
Here is a very simple config which use HTTP and not secure, should only for local testing purpose
Config
Having a yaml file called config-demo in your current folder
apiVersion: v1
clusters:
- cluster:
    server: https://your_cluster_ip:5443
  name: development
contexts:
- context:
    cluster: development
    namespace: dev
    user: developer
  name: dev
current-context: dev
kind: Config
preferences: {}
users:
- name: developer
Connect to remote cluster
kubectl get all --kubeconfig=config-demo --all-namespaces
For long term usage, you will need to copy the content to your ~/.kube/config file
Helm
Add Kubernetes yaml template engine and the package manager for Kubernetes
How to use
helm init
helm upgrade --install -f abc/values-staging.yaml some-name ./abc
# abc/values-staging.yaml the value file
# some-name the release name
# abc the template folder
helm delete --purge mqtt  # mqtt the release name
Install 3rd party packages
helm repo add gitlab https://charts.gitlab.io/ # add remote repo
helm repo update # update index
helm install mirantisworkloads/vernemq
Tips
- Normally when you just updated the configmap the deployment or statefulset pod wouldn't updated, but you can add a label to deployment/statefulset yaml, when the value changes the pods will be recreated
template:
  metadata:
    labels:
      app: vernemq
      configmapVersion: "{{ .Release.Revision }}"
Deploy tools comparsion
https://blog.hasura.io/draft-vs-gitkube-vs-helm-vs-ksonnet-vs-metaparticle-vs-skaffold-f5aa9561f948/
Rolling update
Readiness Probe. Readiness Probe makes sure that the new pods created are ready to take on requests before terminating the old pods. To enable this, first you need to have a route in whatever the application you want to run which would return a 200 on an HTTP GET (Or other type) request.
apiVersion: apps/v1
kind: Deployment
metadata:
  name: hello-dep
  namespace: default
spec:
  replicas: 2
  strategy:
  type: RollingUpdate
  rollingUpdate:
    maxSurge: 1
    maxUnavailable: 25%
  selector:
    matchLabels:
      app: hello-dep
  template:
    metadata:
      labels:
        app: hello-dep
    spec:
      containers:
      - image: gcr.io/google-samples/hello-app:2.0
        imagePullPolicy: Always
        name: hello-dep
        ports:
        - containerPort: 8080
        readinessProbe:
          httpGet:
             path: /
             port: 8080
             initialDelaySeconds: 5
             periodSeconds: 5
             successThreshold: 1
maxUnavailable is an optional field that specifies the maximum number of Pods that can be unavailable during the update process. The value can be an absolute number (for example, 5) or a percentage of desired Pods (for example, 10%). The absolute number is calculated from percentage by rounding down. The value cannot be 0 if maxSurge is 0. The default value is 25%.
maxSurge is an optional field that specifies the maximum number of Pods that can be created over the desired number of Pods
initialDelaySeconds: Number of seconds after the container has started before readiness probes are initiated.
periodSeconds: How often (in seconds) to perform the probe. Default to 10 seconds. Minimum value is 1.
timeoutSeconds: Number of seconds after which the probe times out. Defaults to 1 second. Minimum value is 1.
successThreshold: Minimum consecutive successes for the probe to be considered successful after having failed. Defaults to 1. Must be 1 for liveness. Minimum value is 1.
failureThreshold: When a Pod starts and the probe fails, Kubernetes will try failureThreshold times before giving up. Giving up in case of liveness probe means restarting the Pod. In case of readiness probe the Pod will be marked Unready. Defaults to 3. Minimum value is 1.
Horizontal scaling
V1
apiVersion: autoscaling/v1
kind: HorizontalPodAutoscaler
metadata:
  name: worker-auto-scaling
  namespace: x-prod
spec:
  scaleTargetRef:
    apiVersion: apps/v1
    kind: Deployment
    name: <deployment-name>
  minReplicas: 1
  maxReplicas: 2
  targetCPUUtilizationPercentage: 75 # trigger point
V2
apiVersion: autoscaling/v2beta2
kind: HorizontalPodAutoscaler
metadata:
  name: php-apache
  namespace: default
spec:
  scaleTargetRef:
    apiVersion: apps/v1
    kind: Deployment
    name: php-apache
  minReplicas: 1
  maxReplicas: 10
  metrics:
  - type: Resource
    resource:
      name: cpu
      target:
        type: Utilization
        averageUtilization: 50
  - type: Pods
    pods:
      metric:
        name: packets-per-second
      target:
        type: AverageValue
        averageValue: 1k
  - type: Object
    object:
      metric:
        name: requests-per-second
      describedObject:
        apiVersion: networking.k8s.io/v1beta1
        kind: Ingress
        name: main-route
      target:
        type: Value
        value: 10k
Limit CPU and memory for pods
ports:
- name: db-port
  containerPort: 2345
  protocol: TCP
resources:
requests:
  cpu: 30m
  memory: 64Mi
limits:
  cpu: 200m
  memory: 256Mi
Kubernetes Operator
A Kubernetes Operator is an abstraction for deploying non-trivial applications on Kubernetes. It wraps the logic for deploying and operating an application using Kubernetes constructs. As an example, the etcd operator provides an etcd cluster as a first-class object.
An example Operator
- deploying an application on demand
- taking and restoring backups of that application’s state -handling upgrades of the application code alongside related changes such as database schemas or extra configuration settings
- publishing a Service to applications that don’t support Kubernetes APIs to discover them
- simulating failure in all or part of your cluster to test its resilience
- choosing a leader for a distributed application without an internal member election process
Use Operator
kubectl get SampleDB                   # find configured databases

kubectl edit SampleDB/example-database # manually change some settings
Some 3rd party operators
- Operator registry: https://operatorhub.io/
- Custom operators list: https://gist.github.com/philips/a97a143546c87b86b870a82a753db14c
- Prometheus operator: https://coreos.com/blog/the-prometheus-operator.html
Tools
Kubectx and kubens
Switch faster between clusters and namespaces in kubectl https
- kubectx for switching contexts
- kubens for switching namespaces
Github page: https://github.com/ahmetb/kubectx
Other distributions
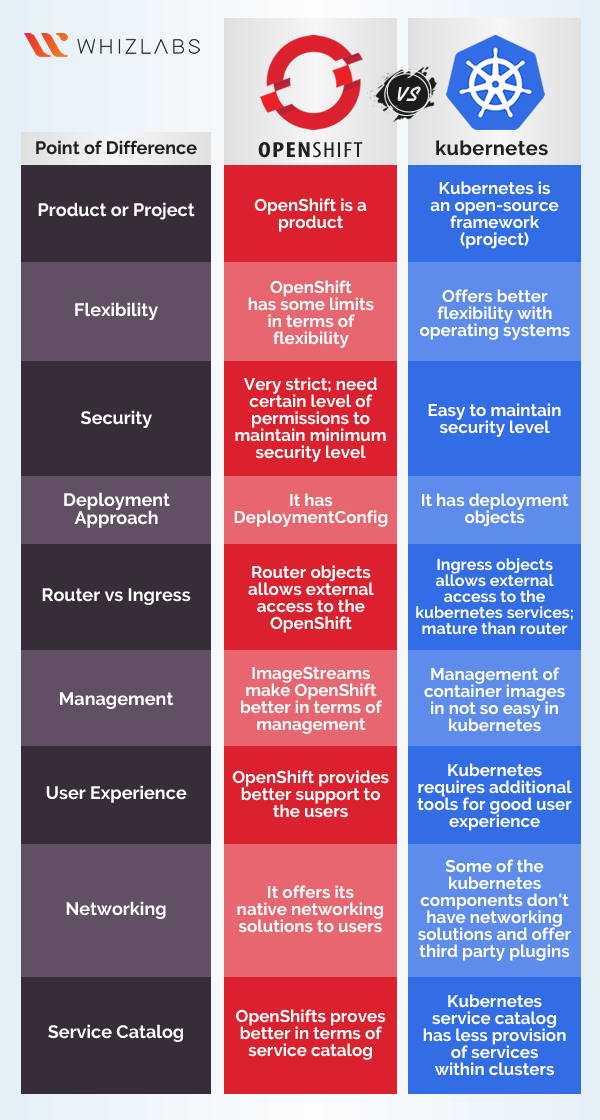
OpenShift(OKD)
https://github.com/openshift/okd
OKD is the Origin community distribution of Kubernetes optimized for continuous application development and multi-tenant deployment. OKD adds developer and operations-centric tools on top of Kubernetes to enable rapid application development, easy deployment and scaling, and long-term lifecycle maintenance for small and large teams. OKD is also referred to as Origin in github and in the documentation. OKD makes launching Kubernetes on any cloud or bare metal a snap, simplifies running and updating clusters, and provides all of the tools to make your containerized-applications succeed.
Differences
- More strict on security, for example you can't run docker images with
rootuser. - Better UI and come with some management tools.
- Integrated CI/CD
- It's a Redhat product, OKD is its open-source project
K3s
https://github.com/rancher/k3s
k3s is intended to be a fully compliant Kubernetes distribution with the following changes:
- Removed most in-tree plugins (cloud providers and storage plugins) which can be replaced with out of tree addons.
- Add sqlite3 as the default storage mechanism. etcd3 is still available, but not the default.
- Wrapped in simple launcher that handles a lot of the complexity of TLS and options.
- Minimal to no OS dependencies (just a sane kernel and cgroup mounts needed). k3s packages required
dependencies
- containerd
- Flannel
- CoreDNS
- CNI
- Host utilities (iptables, socat, etc)