mirror of
https://github.com/wahyd4/one-knowledge.git
synced 2026-08-09 05:06:40 +10:00

519 lines
9.2 KiB
Markdown
519 lines
9.2 KiB
Markdown
---
|
||
title: Linux
|
||
created: 2021-11-09
|
||
updated: 2021-11-09
|
||
type: summary
|
||
tags: [tech, reference]
|
||
external: https://github.com/wahyd4/knowledge/blob/master/categories/devops/linux.md
|
||
---
|
||
|
||
# Linux
|
||
|
||
## Useful commands and tips
|
||
|
||
### Split strings
|
||
|
||
```bash
|
||
# split ip list string by comma and get first one
|
||
export IP=127.0.0.2,127.0.0.3
|
||
echo $IP | cut -d ',' -f1
|
||
```
|
||
|
||
### Create a systemd service
|
||
|
||
Create a file called `/etc/systemd/system/hello.service`
|
||
|
||
```
|
||
[Unit]
|
||
Description=Hello Service
|
||
After=network.target
|
||
StartLimitIntervalSec=0
|
||
[Service]
|
||
Type=simple
|
||
Restart=always
|
||
RestartSec=1
|
||
User=centos
|
||
ExecStart=/app/hello.sh
|
||
|
||
[Install]
|
||
WantedBy=multi-user.target
|
||
```
|
||
Automatically start the service when boot the vm
|
||
|
||
```bash
|
||
sudo systemctl enable hello
|
||
```
|
||
|
||
Start service
|
||
|
||
```bash
|
||
sudo systemctl start hello
|
||
```
|
||
Learned from [here](https://medium.com/@benmorel/creating-a-linux-service-with-systemd-611b5c8b91d6)
|
||
|
||
### ssh
|
||
Do not use default `22` port
|
||
```bash
|
||
ssh user@ip -p 22222
|
||
```
|
||
|
||
Login without password
|
||
|
||
```bash
|
||
# adds private key identities to the authentication agent
|
||
ssh-add ~/.ssh/id_rsa
|
||
|
||
# use locally available keys to authorise logins on a remote machine
|
||
|
||
ssh-copy-id user@ip -p 22222
|
||
```
|
||
|
||
### Add user to the sudo group
|
||
|
||
```bash
|
||
usermod -aG sudo youruser
|
||
```
|
||
|
||
### IP table
|
||
|
||
### Cron job
|
||
|
||
List cron jobs for current user
|
||
|
||
```bash
|
||
crontab -l
|
||
```
|
||
|
||
List cron jobs for some user
|
||
|
||
```bash
|
||
crontab -u user -l
|
||
```
|
||
|
||
Edit cron jobs
|
||
|
||
```bash
|
||
crontab -e
|
||
```
|
||
|
||
#### An example cron job
|
||
|
||
For example, you can run a backup of all your user accounts
|
||
|
||
```bash
|
||
# at 5 a.m every week with:
|
||
# 0 5 * * 1 tar -zcf /var/backups/home.tgz /home/
|
||
```
|
||
#### Check cron jobs logs
|
||
|
||
```bash
|
||
grep CRON /var/log/syslog
|
||
```
|
||
|
||
#### Cron job expression
|
||
|
||
`MIN HOUR DOM MON DOW`
|
||
|
||
Field Description Allowed Value
|
||
MIN Minute field 0 to 59
|
||
HOUR Hour field 0 to 23
|
||
DOM Day of Month 1-31
|
||
MON Month field 1-12
|
||
DOW Day Of Week 0-6
|
||
|
||
### PS
|
||
```bash
|
||
ps aux | grep 'ruby'
|
||
```
|
||
List process, using `grep` to filter processes
|
||
### tail
|
||
Tailing texts from file in realtime
|
||
|
||
```bash
|
||
tail -f a.log
|
||
```
|
||
`f` means following, auto append texts to console
|
||
### nohup
|
||
Simply running application in background
|
||
|
||
|
||
### df
|
||
```bash
|
||
df -h
|
||
```
|
||
Show disk usage and left, `h` means show in human readable way. Normally by MB/GB.
|
||
### free
|
||
```bash
|
||
total used free shared buff/cache available
|
||
Mem: 3960624 416720 270024 22252 3273880 3264060
|
||
Swap: 4104188 109688 3994500
|
||
```
|
||
Show memory usage and
|
||
|
||
### Watch
|
||
```
|
||
watch kubectl get pods
|
||
```
|
||
Continuous running the commands, watching the changes. By default it refresh the result every `2s`.
|
||
|
||
### Change timezone
|
||
```bash
|
||
TZ=Asia/Shanghai;
|
||
ln -snf /usr/share/zoneinfo/$TZ /etc/localtime
|
||
```
|
||
|
||
### Check release
|
||
```bash
|
||
cat /etc/*-release
|
||
```
|
||
|
||
### Debian check system version
|
||
```bash
|
||
cat /etc/issue
|
||
|
||
cat /etc/debian_version
|
||
```
|
||
|
||
### htop
|
||
|
||
like top, but more
|
||
|
||
#### mosh
|
||
|
||
auto reconnect ssh
|
||
|
||
### show last something time
|
||
|
||
```bash
|
||
last shutdown
|
||
last reboot
|
||
```
|
||
|
||
### Count files in current folder
|
||
|
||
```bash
|
||
find . -type f | wc -l
|
||
```
|
||
### Check if a port is open
|
||
|
||
Used Netcat
|
||
|
||
```bash
|
||
if ! nc -z localhost 5672; then
|
||
sleep 3;
|
||
fi
|
||
```
|
||
|
||
### scp copy files between host
|
||
|
||
#### Copy files from remote server
|
||
|
||
```bash
|
||
scp your_username@remotehost.edu:foobar.txt /local/dir
|
||
```
|
||
|
||
### Copy local files to remote server
|
||
|
||
```bash
|
||
scp /path/to/local/file user@server:/path/to/remote/file
|
||
```
|
||
|
||
### Merge video files into one
|
||
|
||
```bash
|
||
ffmpeg -f concat -safe 0 -i ./files.txt -c copy output.mp4
|
||
```
|
||
|
||
In the `files.txt` you should list all the video clips like the following
|
||
|
||
```txt
|
||
file 1.flv
|
||
file 2.flv
|
||
file 3.flv
|
||
```
|
||
|
||
### Curl
|
||
|
||
Curl is a very popular and powerful HTTP client, there is also another very good tool called `httpie` written in Python which is even eaiser to use.
|
||
|
||
The following are some useful commands:
|
||
|
||
#### Post request with file
|
||
```bash
|
||
curl --data "@$(pwd)/fixure/sample.json" --user "foo:bar" localhost:8080/api/abc
|
||
```
|
||
|
||
### Mount
|
||
|
||
#### Mount NFS(Network file system) to local
|
||
|
||
```bash
|
||
|
||
mkdir /to-local-folder
|
||
# mount
|
||
mount -t nfs -O user=abc,pass=pass 192.168.1.2:/nfs-folder /to-local-folder
|
||
|
||
# remount
|
||
mount -o remount /to-local-folder
|
||
```
|
||
|
||
#### Mount folder permanently
|
||
|
||
In the example above, the mounted folder will lost the connection when you restart your system, in order to permanently mount the folder, you will need to edit `/etc/fstab` by adding one more line
|
||
|
||
```
|
||
192.168.1.2:/nfs-folder /to-local-folder nfs defaults 0 0
|
||
```
|
||
You can specify more options
|
||
|
||
```
|
||
192.168.0.216:/nfs-folder /to-local-folder nfs defaults,proto=tcp,port=2049 0 0
|
||
```
|
||
|
||
### Rsync
|
||
|
||
Sync folders and files between folders and hosts
|
||
|
||
### sync between directories
|
||
|
||
```bash
|
||
rsync -avzh /root/rpmpkgs /tmp/backups/
|
||
```
|
||
#### sync folders between hosts
|
||
|
||
```bash
|
||
rsync -avz --exclude downloads --exclude 'some-folder' /mnt rsync://user@192.168.1.2/rsync/ -v -c
|
||
```
|
||
|
||
You can export `RSYNC_PASSWORD` to pass password to the command.
|
||
|
||
#### Check rsync logs
|
||
|
||
```bash
|
||
grep -ir rsync /var/log
|
||
```
|
||
|
||
### Check debian version
|
||
|
||
```bash
|
||
cat /etc/issue
|
||
|
||
cat /etc/debian_version
|
||
```
|
||
|
||
### Debian error bash: netstat: command not found
|
||
|
||
```bash
|
||
apt-get install net-tools
|
||
```
|
||
|
||
### Create CPU loads
|
||
|
||
```bash
|
||
dd if=/dev/urandom | gzip -9 >> /dev/null &
|
||
```
|
||
|
||
### Kill the load process
|
||
|
||
```bash
|
||
kill %1
|
||
```
|
||
|
||
### IP Address
|
||
|
||
```bash
|
||
sudo /sbin/ifconfig
|
||
|
||
ip address # new command
|
||
```
|
||
|
||
### IP range, CIDR
|
||
|
||
```bash
|
||
# ip range ,CIDR network
|
||
|
||
/16 /20 /24
|
||
```
|
||
|
||
### trace route tool
|
||
|
||
```bash
|
||
sudo apt-get install traceroute
|
||
|
||
sudo traceroute google.com -I
|
||
```
|
||
|
||
### linux list all the service with status
|
||
|
||
```bash
|
||
systemctl --full --type service --all
|
||
```
|
||
|
||
### To see details about the RAM installed on your VM, run the following command:
|
||
|
||
```bash
|
||
sudo dmidecode -t 17
|
||
```
|
||
|
||
### verify the number of processors, run the following command:
|
||
|
||
```bash
|
||
nproc
|
||
```
|
||
|
||
### CPU information
|
||
|
||
```bash
|
||
lscpu
|
||
|
||
# Check cpu platform
|
||
|
||
cat /proc/cpuinfo
|
||
```
|
||
|
||
### Running application in background with screen
|
||
|
||
```bash
|
||
sudo apt-get install -y screen
|
||
|
||
sudo screen -S mcs java -Xms1G -Xmx7G -d64 -jar /home/minecraft/minecraft_server.1.11.2.jar nogui
|
||
|
||
detach
|
||
|
||
# To detach the screen terminal, press Ctrl+A, D. The terminal continues to run in the background. To reattach the terminal, run the following command:
|
||
|
||
sudo screen -r mcs
|
||
|
||
# send commands to screen
|
||
|
||
sudo screen -r -X stuff '/stop\n'
|
||
```
|
||
|
||
### ApacheBench To place a load on the load balancer, run the following command
|
||
|
||
```bash
|
||
ab -n 50000 -c 1000 http://ip
|
||
```
|
||
|
||
### Mount drives
|
||
|
||
```bash
|
||
1. Find what the drive is called
|
||
You'll need to know what the drive is called to mount it. To do that fire off one of the following (ranked in order of my preference):
|
||
lsblk
|
||
sudo blkid
|
||
sudo fdisk -l
|
||
You're looking for a partition that should look something like: /dev/sdb1. The more disks you have the higher the letter this is likely to be. Anyway, find it and remember what it's called.
|
||
2. Create a mount point (optional)
|
||
This needs to be mounted into the filesystem somewhere. You can usually use /mnt/ if you're being lazy and nothing else is mounted there but otherwise you'll want to create a new directory:
|
||
sudo mkdir /media/usb
|
||
3. Mount!
|
||
sudo mount /dev/sdb1 /media/usb
|
||
When you're done, just fire off:
|
||
sudo umount /media/usb
|
||
```
|
||
|
||
### Change dns server
|
||
|
||
```bash
|
||
vim /etc/resolv.conf
|
||
```
|
||
|
||
### Last boot
|
||
|
||
```bash
|
||
last reboot | less
|
||
last -x shutdown
|
||
```
|
||
|
||
### Ports scanner
|
||
|
||
```bash
|
||
#nmap scan ports
|
||
nmap -v 203.192.94.53
|
||
```
|
||
|
||
### Check and turn off swap
|
||
|
||
```bash
|
||
# swap
|
||
|
||
1. Identify configured swap devices and files with cat /proc/swaps.
|
||
2. Turn off all swap devices and files with swapoff -a.
|
||
3. Remove any matching reference found in /etc/fstab.
|
||
4. Optional: Destroy any swap devices or files found in step 1 to prevent their reuse. Due to your concerns about leaking sensitive information, you may wish to consider performing some sort of secure wipe.
|
||
```
|
||
|
||
### Reset timezone
|
||
|
||
```bash
|
||
sudo dpkg-reconfigure tzdata
|
||
```
|
||
|
||
### List all timezones
|
||
|
||
```bash
|
||
ls /usr/share/zoneinfo/
|
||
|
||
# check ssh failed retries
|
||
|
||
grep "Failed password" /var/log/auth.log
|
||
```
|
||
|
||
### Linux disk analyse
|
||
|
||
```bash
|
||
### Ncdu analyse linux disk
|
||
|
||
ncdu
|
||
```
|
||
|
||
### VIM setup
|
||
|
||
```bash
|
||
# https://github.com/amix/vimrc
|
||
|
||
git clone --depth=1 https://github.com/amix/vimrc.git ~/.vim_runtime
|
||
sh ~/.vim_runtime/install_awesome_vimrc.sh
|
||
```
|
||
|
||
### check ssh failed retries
|
||
|
||
```bash
|
||
grep "Failed password" /var/log/auth.log
|
||
|
||
# In order to display extra information about the failed SSH logins, issue the command as shown in the below example.
|
||
|
||
egrep "Failed|Failure" /var/log/auth.log
|
||
```
|
||
|
||
## Popular Distributions
|
||
|
||
### Debian
|
||
|
||
### Ubuntu
|
||
|
||
### Manjaro
|
||
|
||
### Fedora
|
||
|
||
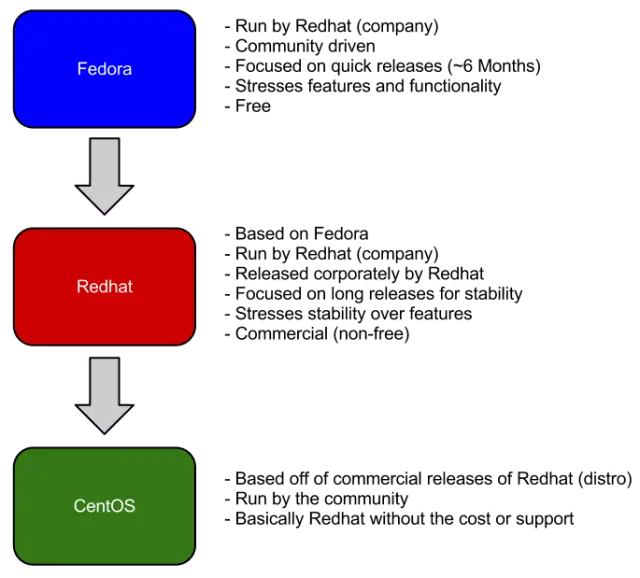
Fedora is the main project, and it’s a community-based, free distro focused on quick releases of new features and functionality.
|
||
|
||
### CentOS
|
||
|
||
CentOS is basically the community version of Redhat. So it’s pretty much identical, but it is free and support comes from the community as opposed to Redhat itself.
|
||
|
||
### RHEL (RedHat Enterprise Linux)
|
||
|
||
|
||
|
||
|
||
RHEL is the corporate version based on the progress of that project, and it has slower releases, comes with support, and isn’t free.
|
||
|
||
### Arch Linux
|
||
|
||
## Package manager
|
||
|
||
* [snap](https://snapcraft.io/)
|
||
* [Brew](https://brew.sh/)
|